


As a supplier of swimming pool lights, I often receive inquiries from customers about how to connect multiple swimming pool lights. In this blog post, I'll share some professional insights and practical steps to guide you through this process.
Understanding the Basics of Swimming Pool Lights Connection
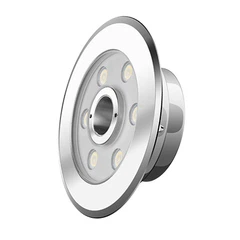
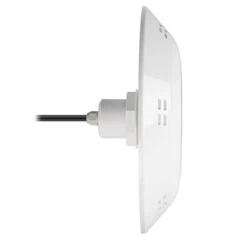
Before diving into the connection process, it's crucial to understand the types of swimming pool lights available. One popular option is Wall Mounted Pool Lights. These lights are installed on the walls of the pool, providing both aesthetic and functional benefits. They can illuminate the pool area, making it safer for swimmers at night and enhancing the overall ambiance.
When connecting multiple swimming pool lights, there are two main electrical connection methods: series and parallel.
Series Connection
In a series connection, the lights are connected one after another in a single loop. The current flows through each light in sequence. One advantage of a series connection is that it uses less wiring, which can save on installation costs. However, if one light fails, the entire circuit will be broken, and all the lights will go out. This can be a significant drawback, especially in a large pool with multiple lights.
Parallel Connection
A parallel connection involves connecting each light to the power source independently. In this setup, each light has its own path for the current to flow. If one light fails, the others will continue to operate normally. This is the preferred method for connecting multiple swimming pool lights, as it provides greater reliability and flexibility.
Steps to Connect Multiple Swimming Pool Lights in Parallel
Step 1: Gather the Necessary Tools and Materials
- Swimming pool lights: Ensure you have the correct number and type of lights for your pool.
- Electrical wires: Choose wires with the appropriate gauge for the power requirements of your lights.
- Junction box: This is used to house the electrical connections and protect them from water.
- Waterproof connectors: These are essential for preventing water from entering the electrical connections.
- Screwdriver, wire strippers, and other basic electrical tools.
Step 2: Plan the Layout
Before installing the lights, plan the layout of the lights on the pool walls. Consider the size and shape of the pool, as well as the desired lighting effect. Make sure there is enough space between each light to ensure proper installation and maintenance.
Step 3: Install the Junction Box
The junction box should be installed in a dry, accessible location near the pool. It should be mounted securely and protected from the elements. Connect the main power supply to the junction box, following the electrical code requirements.

Step 4: Connect the Wires to the Lights
Strip the ends of the electrical wires and connect them to the terminals on the back of each light. Use waterproof connectors to ensure a secure and watertight connection. Make sure to follow the manufacturer's instructions for wiring the lights.
Step 5: Run the Wires to the Junction Box
Route the wires from each light to the junction box. Use conduit or cable trays to protect the wires and prevent them from being damaged. Make sure the wires are properly labeled to identify each light.
Step 6: Connect the Wires in the Junction Box
In the junction box, connect the wires from each light to the appropriate terminals. Use wire nuts or other approved connectors to make the connections. Make sure the connections are tight and secure.
Step 7: Test the Lights
Once all the connections are made, turn on the power supply and test the lights. Check to make sure all the lights are working properly and there are no electrical issues. If any problems are detected, turn off the power immediately and troubleshoot the issue.
Additional Considerations for Wall - Mounted Swimming Pool Lights
When using Wall Mounted Pool Lights, there are some additional factors to consider. Understanding the Wall-mounted Swimming Pool Light Features can help you make the most of your lighting system.
- Waterproof Rating: Ensure that the lights have a high waterproof rating, such as IP68. This will protect the lights from water damage and ensure their long - term reliability.
- Lighting Color and Intensity: Choose lights with the desired color and intensity to create the perfect ambiance for your pool. Some lights offer multiple color options and adjustable brightness.
- Installation Depth: Consider the installation depth of the lights. Different lights are designed for different water depths, so make sure to choose lights that are suitable for your pool.
Safety Precautions
Connecting multiple swimming pool lights involves working with electricity, which can be dangerous if not done correctly. Here are some safety precautions to follow:
- Turn off the Power: Before starting any electrical work, turn off the power supply to the pool area. This will prevent the risk of electric shock.
- Use Ground - Fault Circuit Interrupters (GFCIs): GFCIs are designed to detect electrical faults and automatically shut off the power to prevent electric shock. Make sure all electrical circuits for the pool lights are protected by GFCIs.
- Follow Electrical Codes: Adhere to all local electrical codes and regulations when installing the lights. This will ensure the safety and compliance of your lighting system.
Conclusion
Connecting multiple swimming pool lights can seem like a complex task, but with the right knowledge and tools, it can be done safely and effectively. By choosing the parallel connection method and following the steps outlined in this blog post, you can create a reliable and beautiful lighting system for your pool.
If you have any questions or need further assistance with connecting your swimming pool lights, or if you're interested in purchasing high - quality swimming pool lights, please don't hesitate to contact us for a procurement discussion. Our team of experts is ready to help you find the best lighting solutions for your pool.
References
- National Electrical Code (NEC)
- Manufacturer's instructions for swimming pool lights and electrical components.