


Hey there! If you're like me, you love having a pool that's not just a place to swim but a whole vibe. And one of the best ways to up that pool game is by adding some sick pool edge lighting, especially in a pool with a beach entry. I'm a supplier of Pool Edge Lighting, and I've helped a bunch of folks transform their pools into nighttime oases. So, let's dive in and talk about how you can install pool edge lighting in your beach entry pool.
Why Pool Edge Lighting in a Beach Entry Pool?
First off, why even bother with pool edge lighting in a beach entry pool? Well, there are a bunch of reasons. For starters, it looks amazing. Imagine walking into your pool at night, with soft, colorful lights guiding you along the edge of the beach entry. It creates this really relaxing and inviting atmosphere. It's like having your own private resort right in your backyard.
Secondly, it's a safety thing. The beach entry area can be a bit tricky to navigate, especially in the dark. The lights help you see where you're going, reducing the risk of slips and falls. And if you've got kids or pets around, that extra visibility is super important.
Choosing the Right Lights
Before you start installing anything, you need to pick the right lights for your pool. There are a few things to consider here.
Voltage
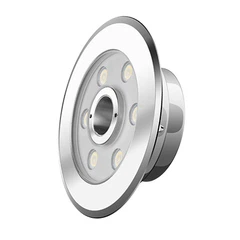
You've got two main options when it comes to voltage: AC12v and AC100 - 240v. The AC12v LED Swimming Pool Light is a great choice if you're looking for something energy - efficient and safe. It's low voltage, so there's less risk of electrical shock. On the other hand, the ac100 240v lighting aluminum is more powerful and can provide brighter illumination. It's a good option for larger pools or if you want a really dramatic effect.
Waterproof Rating
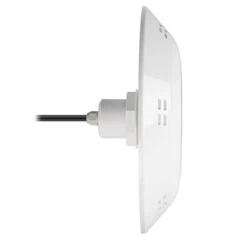
Since these lights are going to be in or around water, you need to make sure they're waterproof. Look for lights with a high waterproof rating, like the Waterproof Swimming Pool IP68 Light. The IP68 rating means the lights are completely dust - tight and can be submerged in water for extended periods without getting damaged.
Color and Style
There are tons of different colors and styles of pool edge lights available. You can go for classic white lights for a clean, elegant look, or get creative with colored lights to add some fun and personality to your pool. Some lights even have the option to change colors, which is really cool for parties or special occasions.
Tools and Materials You'll Need
Once you've chosen your lights, it's time to gather the tools and materials you'll need for the installation. Here's a basic list:
- Lights and all the necessary components (wiring, connectors, etc.)
- Drill and drill bits
- Screwdriver
- Wire cutters and strippers
- Waterproof sealant
- Electrical tape
- Measuring tape
Installation Steps
Step 1: Plan Your Layout
Before you start drilling holes or running wires, take some time to plan out where you want to place the lights. Measure the length of the beach entry area and decide how many lights you need. You want to space the lights evenly for a balanced look. Mark the locations on the pool edge with a pencil or tape.
Step 2: Prepare the Lights
Read the instructions that come with your lights carefully. Some lights may need to be assembled or have the wiring pre - attached. Make sure you understand how everything fits together before you start the installation.
Step 3: Drill the Holes
Using your drill and the appropriate drill bit, carefully drill holes at the marked locations on the pool edge. The size of the holes will depend on the type of lights you're using, so make sure you use the right bit. Be careful not to drill too deep or damage the pool surface.
Step 4: Install the Lights
Once the holes are drilled, insert the lights into the holes. Use the screws or mounting brackets provided to secure the lights in place. Make sure the lights are level and flush with the pool edge.
Step 5: Connect the Wiring
This is the most important and potentially dangerous part of the installation, so if you're not comfortable working with electricity, it's best to hire a professional. Connect the wires from the lights to the power source, following the wiring diagram in the instructions. Use wire connectors and electrical tape to ensure a secure and waterproof connection.
Step 6: Seal the Holes
To prevent water from seeping into the holes and causing damage to the wiring, apply a waterproof sealant around the base of the lights. This will also help keep the lights in place and protect them from the elements.


Step 7: Test the Lights
Before you fill the pool or cover up the wiring, test the lights to make sure they're working properly. Turn on the power and check that all the lights are lit and functioning as they should. If there are any issues, double - check your connections and make any necessary adjustments.
Maintenance Tips
Once your pool edge lighting is installed, it's important to keep it well - maintained. Here are a few tips:
- Regularly clean the lights with a soft cloth and mild detergent to remove any dirt or debris.
- Check the wiring and connections periodically for signs of wear or damage. Replace any damaged parts immediately.
- If you live in an area with cold winters, consider removing the lights during the off - season to prevent damage from freezing temperatures.
Conclusion
Installing pool edge lighting in a pool with a beach entry is a great way to enhance the look and safety of your pool. With the right lights, tools, and a bit of know - how, you can transform your pool into a beautiful and inviting space. As a Pool Edge Lighting supplier, I've seen firsthand the amazing results that proper lighting can have.
If you're interested in purchasing high - quality pool edge lighting or have any questions about the installation process, don't hesitate to reach out. I'm here to help you create the pool of your dreams.
References
- Pool Lighting Installation Guides from Manufacturer Websites
- Personal Experience as a Pool Edge Lighting Supplier