


Hey there, pool owners! If you've got a small pool and you're looking to add some pizzazz to your nighttime swims, installing a PAR56 pool light is a great idea. I'm a supplier of PAR56 pool lights, and I've helped many folks spruce up their pools with these awesome lights. In this blog post, I'll walk you through the steps of installing a PAR56 pool light in a small pool.
Why Choose a PAR56 Pool Light?
First off, let's talk about why a PAR56 pool light is a solid choice for your small pool. These lights are known for their bright and focused illumination. They can transform your pool from a dark, ordinary space into a vibrant, inviting oasis at night. Plus, they're relatively easy to install compared to some other types of pool lights.
The Significance Of Swimming Pool Light Manufacturers' Foreign Trade Export is really important in the pool light industry. You can check out more details about it here. It gives you an idea of how these lights are produced and distributed on a global scale.
What You'll Need
Before you start the installation process, you'll need to gather a few tools and materials. Here's a list of what you'll typically need:
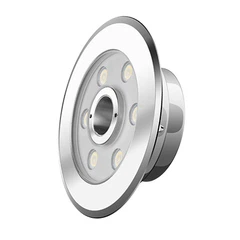
- PAR56 Pool Light: Obviously, you'll need the light itself. Make sure to choose a high - quality one from a reliable supplier (like me!).
- Screwdriver: For removing and attaching the light housing.
- Wire Strippers: To strip the wires for proper connection.
- Electrical Tape: To insulate the wire connections.
- Pool Light Gasket: This helps to keep water out of the light housing.
- Junction Box: Where the electrical connections will be made.
- Electrical Conduit: To protect the wires.
Step 1: Turn Off the Power
Safety first! Before you do anything, make sure to turn off the power to your pool's electrical system. This includes the pump, filter, and any other electrical components. You don't want to get electrocuted while working on the light. Locate the circuit breaker that controls the pool's electricity and switch it off. Double - check that the power is off by testing a nearby pool - side outlet or light.
Step 2: Remove the Old Light (if applicable)
If you're replacing an old pool light, you'll need to remove it first. Use a screwdriver to remove the screws holding the light housing in place. Carefully pull the light out of the pool wall. Be gentle as you don't want to damage the wires. Once the light is out, disconnect the wires from the old light. You can use wire strippers to remove the insulation from the ends of the wires if necessary.
Step 3: Prepare the New Light
Take your new PAR56 pool light out of the box. Check to make sure all the parts are included, such as the light bulb, gasket, and mounting hardware. Apply a thin layer of silicone sealant around the edge of the light housing where the gasket will sit. This will help create a watertight seal.
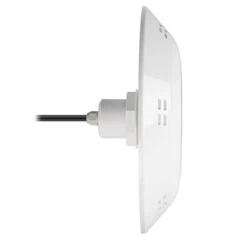
Step 4: Install the Light Housing
Insert the light housing into the hole in the pool wall. Make sure it fits snugly. Use the screws to secure the light housing in place. Don't overtighten the screws, as this could crack the housing. The Research And Development Process Of Swimming Pool Lights is quite interesting. You can learn more about how these lights are designed and improved here.
Step 5: Connect the Wires
Now it's time to connect the wires. Match the colored wires from the light to the corresponding wires in the pool's electrical system. Usually, black is for hot, white is for neutral, and green or bare copper is for ground. Use wire strippers to remove about 1/2 inch of insulation from the ends of the wires. Twist the matching wires together and cover the connections with electrical tape.
Step 6: Install the Junction Box
The junction box is where all the electrical connections will be protected. Mount the junction box near the pool, but make sure it's out of reach of water. Run the electrical conduit from the light housing to the junction box. Feed the wires through the conduit and into the junction box. Make sure all the connections are secure inside the junction box.
Step 7: Test the Light
Once all the connections are made, it's time to test the light. Turn the power back on at the circuit breaker. If the light doesn't come on right away, double - check all the connections. Make sure the wires are properly connected and insulated. If everything looks good and the light still doesn't work, there could be an issue with the light bulb or the electrical system.

Precautions
It's important to follow some precautions when using swimming pool lights. You can find more information about Precautions For Using Swimming Pool Lights here. Some general tips include:
- Don't touch the light while the power is on.
- Regularly check the light for any signs of damage or water leakage.
- Make sure the light is properly grounded to prevent electrical shock.
Conclusion
Installing a PAR56 pool light in a small pool is a relatively straightforward process if you follow the steps carefully. With a little bit of time and effort, you can have a beautiful, illuminated pool that you can enjoy all night long.
If you're interested in purchasing a PAR56 pool light or have any questions about the installation process, feel free to reach out. I'm here to help you make your pool the best it can be. Whether you're a DIY enthusiast or just looking for some expert advice, I've got you covered.
References
- General knowledge of pool light installation from years of experience as a PAR56 pool light supplier.
- Industry standards and guidelines for pool electrical systems.