


LED ground lights are a popular choice for enhancing the aesthetics and safety of both residential and commercial outdoor spaces. However, like any electrical device, they can sometimes malfunction. As a trusted LED Ground Lights supplier, I understand the frustration that comes with non - functioning lights. In this blog, I'll walk you through a comprehensive troubleshooting guide to help you get your LED ground lights working again.
Step 1: Check the Power Source
The first and most straightforward step in troubleshooting non - functioning LED ground lights is to examine the power source. Without proper power, the lights won't illuminate.
- Verify the Circuit Breaker: Locate the circuit breaker panel that controls the outdoor lighting circuit. Check if the breaker for the LED ground lights has tripped. If it has, simply flip it back to the “on” position. A tripped breaker may indicate an electrical overload or a short circuit in the lighting system.
- Inspect the Transformer: If your LED ground lights are low - voltage, a transformer is used to convert the standard household voltage to a lower, safer voltage suitable for the lights. Check the transformer to ensure it's receiving power. You can use a voltage tester to confirm if there is power going into and coming out of the transformer. If the transformer is not working, it may need to be replaced.
- Examine the Power Cable: Look for any visible damage to the power cable that connects the lights to the power source. Cut, frayed, or exposed wires can disrupt the flow of electricity. If you find any damage, repair or replace the cable as necessary. Make sure all connections are secure to prevent intermittent power issues.
Step 2: Check the Bulbs
While LED bulbs are known for their long lifespan, they can still fail.
- Inspect for Visible Damage: Look closely at the LED bulbs. If there are any visible cracks, burns, or signs of overheating, the bulbs may be damaged and need to be replaced. When working with the bulbs, always make sure the power is turned off to avoid electrical shock.
- Test the Bulbs: If you suspect a bulb is faulty but can't see any visible damage, you can test it. You'll need a multimeter set to the appropriate voltage range for the LED. Connect the multimeter probes to the bulb terminals and check if there is voltage. If there is voltage but the bulb isn't lighting up, it's likely a bad bulb. Replace it with a new one [1].
Step 3: Evaluate the Wiring and Connections
Faulty wiring and loose connections are common culprits when it comes to non - functioning LED ground lights.
- Inspect the Wiring: Walk around the entire lighting system and carefully examine the wiring. Look for any signs of damage, such as rodents chewing on the wires or corrosion due to exposure to moisture. If the wiring is damaged, it must be replaced.
- Check the Connections: Ensure that all wire connections are tight and secure. Loose connections can cause intermittent power or no power at all to the lights. You can gently tug on the wires to make sure they are firmly connected to the bulbs, transformers, and other components. If you find any loose connections, tighten them or use electrical tape to secure the connections.
Step 4: Assess the Environmental Factors
Outdoor LED ground lights are exposed to various environmental elements that can affect their performance.


- Moisture and Water Ingress: Since LED ground lights are installed outdoors, they are vulnerable to water damage. Check for signs of water inside the light fixtures or in the wiring. Moisture can cause short circuits and damage the electrical components. If you find water inside a fixture, dry it thoroughly and check for any signs of damage. You may need to replace the gaskets or seals on the fixtures to prevent future water ingress.
- Dirt and Debris: Over time, dirt, leaves, and other debris can accumulate on the light fixtures, blocking the light output or causing overheating. Clean the fixtures regularly using a soft brush or cloth. Make sure to dry them thoroughly after cleaning.
Step 5: Check the Control System
If your LED ground lights are controlled by a timer, motion sensor, or other control devices, these systems can sometimes malfunction.
- Timer Checks: If you use a timer to control when the lights turn on and off, set it to a different time to see if the lights come on. If not, the timer may be faulty and need to be replaced.
- Motion Sensor Tests: If your lights are equipped with motion sensors, wave your hand in front of the sensor to see if the lights activate. If they don't, check the sensor's settings and make sure it's properly aligned. If the problem persists, the sensor may need to be replaced.
Product Recommendations
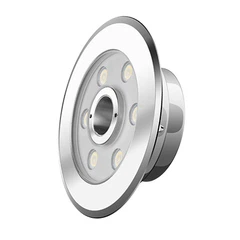
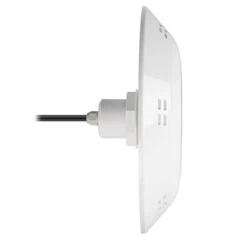
As a LED Ground Lights supplier, we offer a range of high - quality products. Our LED Underground Light is a popular choice for those looking to add a touch of elegance to their outdoor spaces. It is designed to be durable and resistant to environmental factors. If you're in need of a more energy - efficient option, our Better Ground Light is an excellent choice. It provides bright illumination while consuming less power. And for a discreet lighting solution, our Buried Lights are a great alternative. They are installed below ground level, creating a unique lighting effect.
Conclusion
Troubleshooting non - functioning LED ground lights can seem daunting, but by following these steps, you can often identify and resolve the issue on your own. If you're still having problems after trying these troubleshooting steps, don't hesitate to reach out. As a reliable LED Ground Lights supplier, we have the expertise and resources to help you with your lighting needs. Whether you need technical support, replacement parts, or are looking to purchase new LED ground lights for your project, we're here to assist you. Contact us to start a discussion about your requirements and let's work together to create a beautiful and functional outdoor lighting system.
References
[1] Smith, J. (2020). LED Lighting Handbook. Lighting Press.