


Installing pool light fixtures in a ceramic-tiled pool can significantly enhance the aesthetics and functionality of your swimming area. As a trusted Pool Light Fixtures supplier, I'm here to guide you through the process step by step. This blog will cover everything from safety considerations to the actual installation procedure, ensuring you have a well-illuminated and beautiful pool.
Safety First: Understanding the Risks and Precautions
Before you start installing pool light fixtures, it's crucial to understand the potential risks and take necessary precautions. Electricity and water are a dangerous combination, so always follow local electrical codes and regulations. If you're not confident in your electrical skills, it's highly recommended to hire a licensed electrician.
- Turn Off Power: Always turn off the power supply to the pool area before starting any installation work. This includes shutting off the circuit breaker that controls the pool pump, filtration system, and any existing lighting.
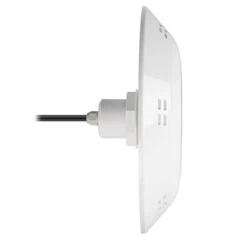
- Use Waterproof Fixtures: Ensure that the pool light fixtures you choose are specifically designed for underwater use. These fixtures are built to be waterproof and resistant to corrosion, which is essential for long-term durability in a pool environment.
- Grounding: Proper grounding is crucial to prevent electrical shocks. All pool light fixtures should be grounded according to local electrical codes. This typically involves connecting the fixture to a grounding wire that is connected to a grounding rod buried in the ground near the pool.
Choosing the Right Pool Light Fixtures
Selecting the appropriate pool light fixtures is essential for achieving the desired lighting effect and ensuring the safety and functionality of your pool. Here are some factors to consider when choosing pool light fixtures:
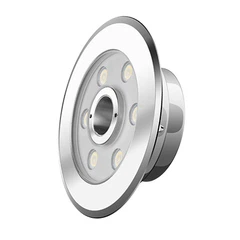
- Type of Fixture: There are several types of pool light fixtures available, including LED, halogen, and incandescent. LED lights are the most energy-efficient and long-lasting option, making them a popular choice for pool owners. Halogen and incandescent lights, on the other hand, produce a warmer light but are less energy-efficient and have a shorter lifespan.
- Luminous Flux: The luminous flux of a light fixture refers to the amount of light it produces. When choosing pool light fixtures, consider the size of your pool and the desired level of illumination. For more information on the choice of luminous flux of lamps and lanterns, you can visit The Choice Of Luminous Flux Of Lamps And Lanterns.
- Color Temperature: The color temperature of a light fixture refers to the color of the light it produces. Warm white light (around 2700K - 3000K) creates a cozy and inviting atmosphere, while cool white light (around 5000K - 6500K) is brighter and more energizing. Consider the mood you want to create in your pool area when choosing the color temperature of your light fixtures.
- Waterproof Rating: As mentioned earlier, it's essential to choose pool light fixtures with a high waterproof rating. Look for fixtures that are rated IP68 or higher, which means they are completely dustproof and can be submerged in water for extended periods without damage.
Planning the Installation
Proper planning is key to a successful pool light fixture installation. Here are some steps to help you plan your installation:
- Determine the Location: Decide where you want to install the pool light fixtures. Consider the size and shape of your pool, as well as the desired lighting effect. Common locations for pool light fixtures include the corners of the pool, along the sides, or in the center.
- Measure the Distance: Measure the distance from the power source to the location where you want to install the light fixtures. This will help you determine the length of the electrical cable you need.
- Mark the Installation Points: Use a pencil or marker to mark the installation points on the ceramic tiles. Make sure the marks are level and evenly spaced.
- Check the Tiles: Before drilling into the ceramic tiles, check for any cracks or damage. If you find any damaged tiles, replace them before proceeding with the installation.
Installing the Pool Light Fixtures
Once you have planned the installation, it's time to start installing the pool light fixtures. Here is a step-by-step guide to help you through the process:
- Drill the Holes: Use a tile drill bit to drill holes in the ceramic tiles at the marked installation points. Make sure the holes are the correct size for the mounting brackets or screws that came with the light fixtures.
- Install the Mounting Brackets: Insert the mounting brackets or screws into the drilled holes and tighten them securely. Make sure the brackets are level and evenly spaced.
- Connect the Electrical Cable: Connect the electrical cable to the light fixtures according to the manufacturer's instructions. Make sure the connections are tight and secure.
- Lower the Light Fixtures: Carefully lower the light fixtures into the pool and attach them to the mounting brackets. Make sure the fixtures are level and centered.
- Seal the Fixtures: Apply a waterproof sealant around the edges of the light fixtures to prevent water from leaking into the electrical connections.
- Test the Lights: Once the light fixtures are installed, turn on the power supply and test the lights. Make sure all the lights are working properly and that there are no electrical issues.
Maintenance and Troubleshooting
Proper maintenance is essential to ensure the long-term performance and safety of your pool light fixtures. Here are some maintenance tips to keep in mind:


- Clean the Fixtures Regularly: Use a soft cloth or sponge to clean the pool light fixtures regularly. This will help remove any dirt, debris, or algae that may accumulate on the fixtures.
- Inspect the Electrical Connections: Periodically inspect the electrical connections to make sure they are tight and secure. If you notice any loose connections or signs of damage, have them repaired immediately.
- Replace the Bulbs as Needed: If the bulbs in your pool light fixtures burn out, replace them as soon as possible. Make sure to use the correct type and wattage of bulbs recommended by the manufacturer.
If you encounter any problems with your pool light fixtures, here are some troubleshooting tips to help you identify and fix the issue:
- Lights Not Working: Check the power supply to make sure it is turned on and that the circuit breaker has not tripped. If the power supply is working, check the bulbs to make sure they are not burned out. If the bulbs are fine, there may be an issue with the electrical connections or the fixture itself.
- Flickering Lights: Flickering lights can be caused by a loose electrical connection, a damaged bulb, or a problem with the power supply. Check the electrical connections to make sure they are tight and secure. Replace the bulbs if they are damaged. If the problem persists, have the power supply checked by a licensed electrician.
- Water Leakage: If you notice water leaking from the pool light fixtures, turn off the power supply immediately and have the fixtures inspected by a professional. Water leakage can be a serious safety hazard and can cause damage to the electrical components.
Conclusion
Installing pool light fixtures in a ceramic-tiled pool is a great way to enhance the aesthetics and functionality of your swimming area. By following the safety guidelines, choosing the right fixtures, and properly installing and maintaining them, you can enjoy a well-illuminated and beautiful pool for years to come.
If you're interested in purchasing high-quality pool light fixtures, explore our range of Suitable Luminaires For Swimming Pool and Swimming Pool Luminaires. We offer a wide variety of fixtures to suit your needs and preferences. Contact us for more information and to discuss your pool lighting requirements. We're here to help you transform your pool into a stunning and inviting space.
References
- Electrical safety standards for swimming pool installations.
- Manufacturer's instructions for pool light fixtures.
- Local electrical codes and regulations.